Wednesday

Fab Finds in Fabrics - Vintage Prints

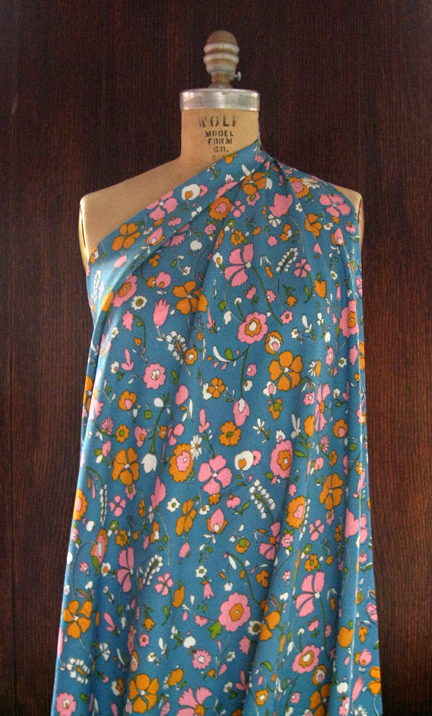
I've been having some luck as of late with vintage fabric finds. I came across a few fun fabrics at a thrift shop a while back and it inspired me to look on eBay and Etsy for more. Here are a few of the standouts:
This one is an Etsy purchase. It's such a sunny tiger print, isn't it? It's a synthetic knit and it's going to be a hostess dress when it grows up.
This sophisticated print features dancers - sort of a 50's Follies Bergère on beige. It was one of the thrift shop finds that started my current obsession. I don't have any plans for it yet. This one is a drapey rayon crepe.
Heavy linen is the substrata for this painterly plaid. It's such a pretty print and the colors are just delightful. It's an Etsy find. I'll be making this up into a simple shift dress.
Another Etsy find is this polyester crepe de chine with a 70's chevron print on it. This will be a shirt dress one day. It's very Vera, isn't it?
This is another one of the thrift shop purchases that launched this ship. It's a sheer print that reminds me of suns. This will be a summer shirt for me this year.
I've always been fond of printed crepe linings in jackets and coats. That's what this mod polyester floral crepe will be eventually. It's from eBay.

All this fabric acquisition has taxed my storage space a bit, so I'm destashing, as they say, on Etsy right now. Have a look at the vintage fabrics and patterns I have up for sale.

Monday

Forget the Carpet, Does the Dress Match the Drapes?

Last week I featured a craft project from 1001 Decorating Ideas - the magazine from the 60's featuring Conso trimmings. As I was leafing through them looking for projects I came across some of the fashions they created. They're a little... Well, judge for yourself:
Swathed in mushroom ribbon, this chic model is just the thing for a casual lunch. Is that Maude Adams behind those enormous sunglasses?
Hit the courts in this snappy tennis outfit lovingly trimmed with tassel fringe in blue and green - note the matching racket cover and sock pompons...
What better way to greet your guests for alfresco dining than in this yellow brunch coat? What hostess doesn't want to match her pillows?
...Or her drapes? This middle eastern inspired hostess caftan is made of the same fabric and trimmings as her draperies. Just the thing for the woman who never knows what to wear.
For those nights when you have to play Juliet, what could be better than this stunning white Empire gown?
And where for art though Romeo? Right here! Note the matching trim on the shades. I have to say, I love the creativity involved here. Can you imagine the joy these stylists must have felt going into a room completely stocked with every kind of trim imaginable and being told to use as much of it as humanly possible in every project? Sometimes restraint is a good thing...

Friday

Fond of Fondue - Pots on Parade

A couple of weeks ago, I posted an episode about chafing dishes. In it I said that though a chafing dish can be used for fondue, it's best to have a dedicated fondue pot. So I thought I'd give you a glimpse of my fondue pot collection. I hope it serves as inspiration to get you own if you don't have one, or to make some fondue if you do!
I love fondue - particularly the cheese variety, and I love the fondue pots you serve it in. I have quite a few of them. I chose six to share with you today. Above you'll see my most recent addition - a beautiful silver pot with a bulbous wood handle. Featured with these pots are some of the napkins in my line. These napkins are our Jane Linen line in Spring.
Next up is my electric fondue pot by Oster. Simple one touch temperature control! It's accompanied by my tablecloth check napkins.
Next is a striking architectural fondue pot in orange with a black and white base. The sterno cup swings out on a hinge! I love how the inside of the base is enameled in white. It's such a nice touch - shows a lot of thought went into the design. This pot is featured with our Gillian floral napkins.
Another stark modern design is this white fondue pot. The base is made of a sheet of metal that's folded to support the sterno pot and a grate. The grate supports the pot. Very nicely designed! This one came with its own matching fondue forks. Featured here are our Jane linen napkins in pumpkin.
For diminutive desserts, this pot can't be beat! It's tiny compared to the others and just perfect for chocolate fondue for two! Instead of sterno, this pot has a candle. I even have tiny little forks to use with it! It's twinned with our Jane linen napkins in Peacock - very Howard Johnson's - so chic!
Last, but not least is my favorite. This elegant pot is from Dansk - you my recognize the handle on the lid. I especially love the elephant-like legs with wooden feet and the rough, artfully rusty iron structure. Featured with the pot are our Jane linen napkins in Buttercup. In addition to the different pots, you'll also see my collection of vintage fondue forks - you can't eat fondue without the proper forks!

Shopping for these little niceties is easy and fun. Vintage and thrift shops, flea markets and eBay are rife with fondue accoutrements. You can find them new now, too - the fondue craze is back!

Of course the pots and forks are just the beginning. Here are a few recipes for fondue and below, you'll find the episode of my show in which we made fondue with Margaret Cho!

Wednesday

Vintage Craft - Fringy Fabulous Screen

One of my favorite vintage home decorating magazines is 1001 Decorating Ideas. Particularly the issues from the mid to late 60's. It was at that time that the magazine was published by Conso, the trimming company. Consequently the design schemes and projects were outrageously adorned with the publisher's product. There are issues and issues full of window treatments made of nothing but trimming, clothing with oversized upholstery trim piled on, walls, curtains and furniture all trimmed in braid - in the same room, and projects like this one.
It's a screen that's been covered in striped fabric and completely trimmed with ball fringe, pompon trim and knotted fringe. The result is an incredible statement piece that can add a dramatic accent to a corner. It goes together in three simple steps with these materials:


4 11" wide, 1" thick pine shelves
Striped fabric (if stripes run vertically or horizontally, cut on bias) cut to wrap around shelves
6 hinges
Stapler
Gimp braid for back
Various fringes - ball, knot, boullion
Aleen's Fast Grab Tacky Glue
Wrap the shelves in the fabric and staple it to the back of the shelves.
Trim the fabric close to the staples, and then glue the gimp over the edge to mask it. Put the hinges on the backs of the boards, but don't attach the boards together yet.
Trim the boards with the trimmings, pinning them on to match the stripes on the fabric. Aleen's Fast Grab Tacky Glue dries quickly, so no need to wait for them to dry. When you've glued down the trimmings, it's time to attach the panels together. Screw in the other half of the hinges while the shelves are laying face down, even on the bottom edges.


We love Conso here at Brini Maxwell HQ. They provided us with some of their great product for my show on the style network. We made another project from 1001 Decorating Ideas on the show - it was trim covered styrofoam fruit.
Click here to learn how to make them. Expect to see more of the over the top projects from 1001 Decorating Ideas here on the blog. They're just too outrageous to let slip quietly into history!

Monday

Contact High - Spring on the Highline.


We had some remarkably beautiful weather this past weekend. I took the opportunity to make a trip to the High Line park , here in New York. For those of you who don't know the High Line, it's an old elevated rail way line on the west side of Manhattan that has been derelict for years. It was recently turned into a park that lets you walk from the Meat Packing District up to Chelsea, and eventually all the way up to the mid 30's. It's a brilliant public works project and is beautifully designed to integrate the sorts of wild plants and flowers that grew on the abandoned tracks for so many decades.
The most striking part of the park right now, is the imposing Standard Hotel, that was built to straddle the park. Here it is in the late afternoon sun, surrounded by the throngs of winter weary New Yorkers that joined me in celebrating the weather that day.
So much of the foliage is still dormant. There are lots of remnants of fall still visible.
The park features a meandering walkway, sometimes wood, sometimes concrete and it blends into the gardens with long concrete fingers that incline up from the dirt.
You can get a better sense of the beauty of the design from above. Here's a shot of a section of the park from the 9th floor of the Standard Hotel
Spring is starting to say hello in lots of different ways. Here are some budding leaves on a tree.
Some of the vistas from the park are spectacular. This is one of my favorites. It's a view down the west side highway over the bay to the Statue of Liberty in the distance.
Another hint of spring - a pretty pink flowering bush.
The park ends at 20th street right now, but they have plans to extend it quite a bit further. Here's a shot of the future of the park.

If you get to New York, be sure and see the park. It's a delightful chance to see New York from a totally different angle.

Friday

Nosh Pit - All About Matzoh

All of you goyem out there may not know what this is. It's matzoh (or matzah, or matzo) - the traditional unleavened bread used in the Jewish holiday of Passover.
Now you may be asking yourself, "what is Brini, shiksa (glossary of terms at end of post) that she is, doing writing a blog post about matzoh and Pesach? Well, I'll tell you, I have more than a passing acquaintance with all things Jewish. As hard as it may be to believe, this blonde haired, blue eyed girl is part JAP.

Being part Jewish, this season of the year brings me great nachas. It gives me the opportunity to buy the food of my people, most notably, matzoh. Though the basic recipe of flour and water never changes, there are many types of matzoh, so you shouldn't get fachadick, I'll give you a run down.

- Unsalted: This type is the basic matzoh. Labeled as kosher, it can be used in the Passover ceremonies.

-Lightly salted: This is the basic matzoh sprinkled with kosher salt. It's generally not used for the holiday, but is a bit more geschmak than unsalted is.

-Egg: This matzoh adds egg to the recipe. They frequently use fruit juice instead of water.

-Egg and Onion: Egg matzoh with onion flavor added.

-Whole wheat: Made with whole wheat flour.

Matzoh can be made at home and it's simple to do. Combine 3 1/4 cups flour with one cup of water and blend well. separate the dough into small parcels and roll them out flat. Place them on a cookie sheet and prick all over with a fork, then bake at 500 degrees until they brown.

It's a bit ironic that during one of the big holiday seasons, when aside from Hashem, of course, it's all about entertaining with lots of mispachas and mishpocha running around, and as a baleboosteh, you have to serve kosher. It's a shpilkes, it's enough to make you meshugeneh. There are options, however. Lots of things can be done with matzoh and sauces both sweet and savory You can even get chocolate covered matzoh.
So the next time you walk down the ethnic aisle in your supermarket, why not pick up some matzoh? If you're going to fress, you may as well find something geschmak. Just don't eat so much you get chaloshes and plotz!

Glossary for this blog post:

Goyem: Non Jewish person
Shiksa: Non Jewish woman
Pesach: Passover
Nachas: Much joy
Fachadick: Confused
Geschmak: Tasty
Hashem: Literally The Name - G-d
Mispachas: Family
Mishpocha: In-laws
Baleboosteh: Great homemaker
Shpilkes: Trouble
Meshugeneh: Crazy
Fress: Eat
Chaloshes: Nauseous
Plotz: Explode

Thanks to sillymusic.com for the yiddishisms.

Wednesday

Blooming Napkins - Simple Napkin Embroidery

Hi people! It's spring! The weather is so beautiful here on the east coast. I was inspired to create something springy today, so I put together an embroidery project using my Felix Populi Tablecloth Check Napkins. It's the perfect base for daisies! The white, yellow and green look so cheerful on the red and white check ground. I love simple embroidery and this project is just that! I used three stitches and four different colors of yarn. Here's what you need: 

 Napkins  
Embroidery floss in ecru, yellow and two shades of green
Embroidery needle
Embroidery hoop
Scissors

I did this freehand, so no markings necessary. If you're new to embroidery, you'll want to practice the stitches on some scrap fabric first. I started with French knots, which formed the flower centers. To make a French knot, come up at the point you want the knot to sit, wrap the yarn around the needle twice.
 Then put the point down very close to where the yarn comes out of the fabric, but not in the same hole. Pull the yarn closely around the shaft of the needle and press it down to the surface of the fabric.
Then pull the needle through and it will catch the loops and make a nice little nubbly knot on the surface of the fabric.
When working on something like a napkin that will get a bit of wear, I like to leave a tail when I begin my knots and then tie them off with the tail that comes back through the fabric with a square knot or a granny knot.
The petals are a detached chain stitch. Come up through the fabric close to the French knot, then go down right next to the up-stitch but don't pull the loop flat - about 3/8" away from the French knot, perpendicular to the stitches you've just taken, come up and with the point of the needle, catch the loop.
 Insert the needle just beyond the first stitch and pull the stitch tight. It will catch the loop and create the petal. Tie off as you did your french knot. Keep your stitches short so they are less apt to get snagged.
 The leaves are done in satin stitch. I've separated one strand of the two different colors of green into three threads each and combined them.


The satin stitch is done by imagining a leaf shape on the surface of the fabric and filling it in by creating parallel stitches over the surface of the shape - coming up at the bottom and down at the top along the edges. Again, tie off with a knot on the back.

 To finish the design, I've scattered a few French knots in white through it to represent the charming potential of daisy buds. Once you get going this doesn't take long at all. You can complete a full set of napkins over a weekend - perfect for spring meals alfresco!


Monday

Do, Do, Do... What to Do - Musings on Hairstyles

Hi people. I've been thinking of changing my hairstyle. My friend Thanos will love this post. Among other things, he does this sort of thing on Blythe dolls. I'm particularly fond of asymmetrical styles and have found a few examples to show my hair dresser.

These are rather pretty, simple styles that might be fun for every day.

Speaking of Asymmetrical, how does she keep this up?

This is a fun style. I love sausage curls and if styled into a fall you can just pin them on and off you go!

Speaking of falls, I'm thinking of getting one. What do you think? Long or short?

Maybe I should go with a medium length one?

I'll let you know what I decide. It's fun to change up your look sometimes. How often do you change your hairstyle? Is it traumatic? Thanos, when are you coming to New York to give me the Blythe treatment?