Showing posts with label crafting. Show all posts

Thursday

Ready for Spring - You're Own Little Flower Box

Vintage craft magazines can be such great sources of inspiration! McCall's Needlework and Crafts magazine from 1967 is the source for this charming little project.
It's a trinket box, but what I like about it is the technique can be adapted to so many materials end uses. They suggest you use felt for the flowers and leaves, but you could also use different types and colors of paper, fabric, leather or even rolled fondant! Here's the template for the flowers:
Just right click, or command click on the image above and choose save to download them for your own use. You can resize them as needed in photo editing software.

I did a needlework project based in part on this idea. Instead of glue I used french knots to embroider the felt flowers to the surface. Here's the end result:

What would you do with this idea?

Wednesday

Trim and Tubing - A Match Made in Heaven

A few months ago I featured a craft project from Conso Trimming's 1001 Decorating Ideas Magazine. While leafing through another issue I came across this project which is reminiscent of both that project and the Mexican style terry cloth mirror from a few weeks ago. This project has so many possible applications and is such fun to make!
These columns are perfect for framing a window or doorway, but they can also be used as posts for a headboard, table legs or on a smaller scale as accents in a centerpiece or even candle holders! They're made with heavy weight paper tubing - the kind carpets are rolled on. You can usually get the carpet cores from carpet and rug stores, stop by and ask.

Once you've gotten your tubes, test them out for height. If you want them to be a specific length you may have to cut them down to fit. This can be done with a saw. This project is great if you have lots of trims left over from other projects. It doesn't take a lot of trim to encircle the tube. Keep in mind that if you want two tubes that match you need to have twice as much trim. The trimming used in the above picture is all about bright colors, but imagine how beautiful it would be done in monochromatic white or even all black!

Wrap your tubing with the trims and glue them in place with Aileen's Fast Grab Tacky Glue, then stand them up in place and you have an instant statement! As shown in the picture, when put at a window they can dramatically increase the height and add some drama to your architecture. I like the table leg idea also though. If you have a table with 4 ordinary legs just sheath the legs in the trimmed tubing for a festive touch for a Mexican dinner, or for good!

The sale continues on eBay. New listings go up tonight (7/21/10) at 9 eastern! Be sure and have a look!

Summer Fun With Terry

No, I don't mean Terry Bradshaw, or Terry Garr, or Tarrytown - This terry is cloth! Something about terry cloth just makes me think of summer. It's a great fabric for easy living and has had it's place in beach and poolside entertaining for many years.

While looking for a project for my post today, I was leafing through a McCall's 1968 You-Do-It Home Decorating magazine and came across some fun terry projects. One of them reminded me of a project we did on my television show - terry cloth pillows!
These pillows from the magazine are made with Pucci washcloths and tea towels and they said you could find them for between $2 and $5. Good luck with that. You can still find fun printed towels at thrift shops and bright solids, which can be found anywhere, can be fun too. The process to make them is super simple. Just stitch them together around all the edges with wrong sides together. If you're feeling ambitious you can make them a little more special by stitching them together with right sides in and putting a velvet welt in the seam as shown above. Leave a 5 - 6" opening at the bottom for stuffing and when stuffed, just stitch the opening up. You can stuff them with polyfill or if you'd like to be frugal, do what we did on the show and use old nylons that have been laundered. The nylons won't rot if they get wet by the pool.

Another charming project is a terry cloth tea cozy.
It's made from two printed washcloths and backed with batting and lightweight cotton. You can use an insulating fabric for more heat retention, if you prefer. Stitch around the pattern for a trapunto effect.

The piece de resistance of these projects from 1968 is the terry cloth covered mirror frame.
This one is a little more complicated. It's made up of 7 different brightly colored wash cloths that have been cut into rectangles and wrapped around a plywood frame. I just love how it looks, don't you?

You'll need:

7 washcloths, each in different bright colors
2 18" square pieces of 3/4" plywood
12 decorative nails with 3/4" heads
8 1 1/4" finishing nails
1 8x8" mirror
12 large head tacks
Aileen's tacky glue
18" of decorative chain to coordinate with your decorative nails
2 3/4" round head wood screws and washers

Draw lines 3" in from the edge of one of the plywood pieces and then cut out the resulting 12" hole. On the second piece draw a line 6" in and cut out the resulting 6" hole. On bottom frame, draw a line 2" in from edges. this designates where the fabric will end. Extend the inner edges of the cuts with lines drawn out to the outer edges of the bottom and top frames. On the top frame, draw lines bisecting the center of each side.

The corners of the bottom frame will take 4" squares of terry. The sides will take 6" squares. Mix and match your colors for a pleasing effect. It's best to plan the arrangement out in advance to avoid having colors overlap between the top and bottom frames. Cut the squares of terry out carefully making sure the edges are straight. The fabric is too thick to seam in place, so the raw edges will be exposed. Using the tacky glue, glue down the corners on the bottom frame first, following the guide lines you drew on the wood. Then move on to the edge pieces and carefully glue them down and wrap the edges around to the back of the frame. Set the bottom frame aside to dry and move on to the top frame. The corners of the top frame will be 6" squares, the edges of the bottom frame will be 6x8" pieces. Repeat the process of glueing the pieces down to the face of the frame, but only wrap the fabric around the inner opening edges, don't wrap the fabric around to the back on the outer edge.

After your glued frames have dried completely you can connect the two with the finishing nails. Nail the frames together in the four inside corners and on the seam lines between the fabrics along the edges. Keep the nails close to the edge. Turn the frames over and carefully wrap the loose edges of the top fabric around both layers of plywood and glue them in place. After they dry you can attach the decorative nails to the front at each inner seam edge covering the finishing nails used to hold the frames together. Place the mirror over the opening in the back and hold it in place with the large head tacks. The last step is to attach the chain using the round head screws and washers. Screw it into the back corners and hang your mirror!

Vicky Howell had a fun terry cloth project on her blog recently. Have a look at that one too!

Saturday

Fun with Yarn - Tassels and Pompons

My trip to Denver was very successful! Over a hundred people had a wonderful time making tassels and pompons at the Denver Public Library. I think what's fun about the projects are they're easy to make and you see results so quickly. For those of you who weren't able to join us for the event in Denver, here's a short tutorial on how to make pompons.

Your first step is to choose a yarn that has some loft to it. The ball or cone should feel spongy or springy to the touch and have some give to it. Then you're going to choose something to wrap the yarn around. I chose a mini-DV tape box. The larger form you use, the more yarn you'll need to make the pompon fluffy. Wrap the form with the yarn until you have a nice bulky hank on it.
Next, slide the hank off the form and tie it tightly around the middle so you have loops on both side of the tie. It's important to use a strong yarn or string for tying your pompon. It has to be tied tightly and it puts a lot of pressure on the yarn.
 Once it's tied, cut the loops on both sides
And fluff out the pompon
It's going to look sort of lop-sided initially, so you'll need to give it a haircut to even it out. It makes a bit of a mess, so it's best to cut it over a plate or tray. Leave the tails from the tie on it to attach to your project.
My friend Marisa Pawelko is putting together an event for the Craft and Hobby Association summer trade show, CHA, to raise awareness of the delicate balance of the worlds oceans and has asked me to help by making two projects for it - one for the home and one to wear. Inspired by the pompon my friend Trish wore in her hair at the Denver event, I decided to make a pompon headband for the latter
...and a key tassel for the former.
If you'd like to learn how to make tassels have a look at this video on the subject from several years ago:

Wednesday

Kitschy-Fun Craft Project From Guest Blogger Margot Potter

With me up to my eyeballs in moving and renovation I asked my friend Margot Potter to be a guest blogger this week. She's come up with a fun decoupage project I know you'll enjoy. Thanks Madge!

Hello, people!

I’m Margot Potter, a.k.a. The Impatient Crafter™, but my friends call me Madge. My gal pal Brini is knee deep in renovating her fabulous new flat, so I’m stepping in for her today. What fun!

Brini and I both worship freely at the Temple of Kitsch and as soon as she asked me to create a post I immediately thought of my Donny vs. Bobby purse. It’s a Teen Idol smack down! In one corner, we have the cornfed, baby faced heartthrob from the Midwest, Donny Osmond. In the other, the slightly older and more experienced stud muffin from southern California, Bobby Sherman. Who will emerge victorious? Let the battle begin!
To make your own teen idol purse select images of your won personal favorites! Will it be Humperdink vs. Jones? Reynolds vs. Namath? Greg vs. Keith? The mind simply reels! After you’ve settled on a suitable pair, remove the handle and hardware from a blank wooden purse. Apply two layers of acrylic paints in burnt orange on one side and avocado green on the other and let dry. Cut out your images, eyes and text and adhere using a decoupage medium. (I used images and text from vintage magazines.) Don’t fret if the images bubble up, they’ll relax after the paper dries. The final touch is a smattering of crystals applied through a heart shaped stencil.
That’s all you need to have a simply adorable purse in a flash! You can show whichever side tickles your fancy on any given day.

I can’t wait to see the magic Brini is making, can
xoxo,
Madge

(PS: You can find more kitschy ideas at my website www.margotpotter.com and my blog http://margotpottertheimpatientcrafter.blogspot.com/)

Pretty Little Package - Vintage Crafting Kits

Hi people! I love vintage craft kits. I have a nice little collection of them. They represent pure potential when they're in their uncompleted condition and I'm afraid I haven't tapped that potential in a lot of the ones I have. Here are a few of my favorites:
This one is so cute for a boys room! It's from Avon (who knew they made embroidery kits?), and it features antique cars on a linen ground.
It's unusual in that it's designed to hang as a strip from a simulated wood mount that's included in the kit. It's all about crewel work. I picked this one up at a thrift shop on Long Island years ago.
Here's another crewel kit. This one features flowers in a basket.
This one is unusual in a number of ways - the dark linen ground, the variety of stitches including the pompon centers and, perhaps most notably the three dimensional butterfly that's worked separately and then applied to the surface of the finished piece. This was an Etsy purchase.
This last one was quite an inspiration to me. It's a multi-media kit that features felt applique and embroidery.
I love the dimensional flowers made of felt and accented with french knots. Look at the little jeweled centers - so cute.
This was the basis for a kit I designed myself.
It's a felt applique kit with embroidered stems and leaves.
 I loved the idea of anchoring the felt flowers with french knots so that's how I designed the centers of the daisies. 

Vintage crafting kits are such fun to find and work. They hail from the past, so you can be reasonably assured that you won't find a lot of copies around. They can be found on Etsy and eBay, as well as at thrift shops and yard sales.

If you don't have the patience to go digging around for a vintage one, you can find my daisy kit in two different colorways on Etsy and in my Brini Maxwell Shop at Felix Populi. Do you like crafting with kits, or do you prefer to design your own projects?

Happy crafting!

Needlepoint - Not Just for Men Anymore!

Back in the 60's and 70's needlepoint was as popular as knitting is now. It was enjoyed by housewives, celebrities, free wheeling single girls like myself - even football players! And the interest in the medium made fertile ground for talented designers who created beautiful projects for themselves and others. It was such a popular hobby that books were published and magazines had countless features on the craft.

What I like about needlepoint is it can be easy or difficult, simple or complex. You can decide how involved you want to get in fancy stitches and shading, but simple projects can be equally as compelling.
This bandana pillow is a good example of simple. The design is easy to recreate. It's from one of my favorite needlepoint books from the 70's - Better Homes and Gardens Needlepoint, 1978.
Slightly more complex are these needlepoint flowers from the same book. The petals are each done individually, then wired and taped to a stem - such a pretty detail in a room!
Of course you can get as complex as you want to. Also from BH&G This freeform design breaks all the rules and is a lovely example of needleplay.
Our last Better Homes example is the beautiful kresh done in an abstract style. The detailed shading and elegant painterly quality of the faces is just lovely - so modern and sophisticated, yet still retaining a sense of humor.

Men took to needlepoint in the 70's, like they're taking to knitting now. There was quite a faction of male needlepointers, The most famous was perhaps Rosey Grier, the LA Giants tackle.
He loved the art and published a book all about it and the men who do it.
Here's Rosey with some of his projects

Another talented male needlepointer was Louis J. Gartner, Jr. He published a book in 1970 (Needlepoint Design, A House and Garden Book) that featured some of the beautifully detailed work he did.
This is a good example of his work. Notice the sense of depth he was able to achieve in a medium not unlike digital photography. Each stitch is like a pixel. Take note of how he uses the diagonal tent stitch (the basic stitch in needlepoint) to his advantage by lining them up to create a pin that holds objects on the wall. I particularly love the shadows cast in this still life.

Needlepoint is due for a revival. It's languished in the land of teddy bears and folk art long enough. If you're interested in the more creative side of needlepoint look on eBay or Amazon for the books mentioned above. I also have a few books on the art for sale on Etsy. Have a look at those too!

We did an episode on the art of needlepoint a few years back. Here it is again if you missed it:

Fab Finds in Fabrics - Vintage Prints

I've been having some luck as of late with vintage fabric finds. I came across a few fun fabrics at a thrift shop a while back and it inspired me to look on eBay and Etsy for more. Here are a few of the standouts:
This one is an Etsy purchase. It's such a sunny tiger print, isn't it? It's a synthetic knit and it's going to be a hostess dress when it grows up.
This sophisticated print features dancers - sort of a 50's Follies Bergère on beige. It was one of the thrift shop finds that started my current obsession. I don't have any plans for it yet. This one is a drapey rayon crepe.
Heavy linen is the substrata for this painterly plaid. It's such a pretty print and the colors are just delightful. It's an Etsy find. I'll be making this up into a simple shift dress.
Another Etsy find is this polyester crepe de chine with a 70's chevron print on it. This will be a shirt dress one day. It's very Vera, isn't it?
This is another one of the thrift shop purchases that launched this ship. It's a sheer print that reminds me of suns. This will be a summer shirt for me this year.
I've always been fond of printed crepe linings in jackets and coats. That's what this mod polyester floral crepe will be eventually. It's from eBay.

All this fabric acquisition has taxed my storage space a bit, so I'm destashing, as they say, on Etsy right now. Have a look at the vintage fabrics and patterns I have up for sale.

Vintage Craft - Fringy Fabulous Screen

One of my favorite vintage home decorating magazines is 1001 Decorating Ideas. Particularly the issues from the mid to late 60's. It was at that time that the magazine was published by Conso, the trimming company. Consequently the design schemes and projects were outrageously adorned with the publisher's product. There are issues and issues full of window treatments made of nothing but trimming, clothing with oversized upholstery trim piled on, walls, curtains and furniture all trimmed in braid - in the same room, and projects like this one.
It's a screen that's been covered in striped fabric and completely trimmed with ball fringe, pompon trim and knotted fringe. The result is an incredible statement piece that can add a dramatic accent to a corner. It goes together in three simple steps with these materials:


4 11" wide, 1" thick pine shelves
Striped fabric (if stripes run vertically or horizontally, cut on bias) cut to wrap around shelves
6 hinges
Stapler
Gimp braid for back
Various fringes - ball, knot, boullion
Aleen's Fast Grab Tacky Glue
Wrap the shelves in the fabric and staple it to the back of the shelves.
Trim the fabric close to the staples, and then glue the gimp over the edge to mask it. Put the hinges on the backs of the boards, but don't attach the boards together yet.
Trim the boards with the trimmings, pinning them on to match the stripes on the fabric. Aleen's Fast Grab Tacky Glue dries quickly, so no need to wait for them to dry. When you've glued down the trimmings, it's time to attach the panels together. Screw in the other half of the hinges while the shelves are laying face down, even on the bottom edges.


We love Conso here at Brini Maxwell HQ. They provided us with some of their great product for my show on the style network. We made another project from 1001 Decorating Ideas on the show - it was trim covered styrofoam fruit.
Click here to learn how to make them. Expect to see more of the over the top projects from 1001 Decorating Ideas here on the blog. They're just too outrageous to let slip quietly into history!

Fabulous Felted Fungi - Needle Felting Mushrooms

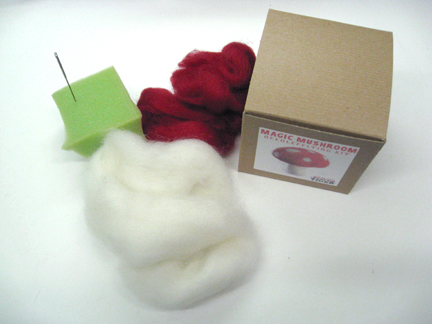
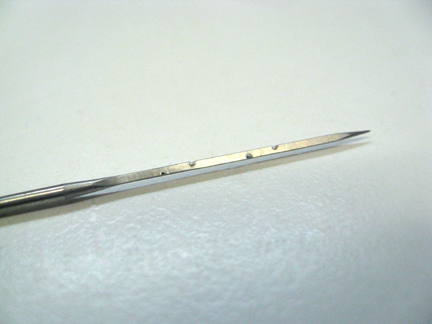
Needle felting is a very strange craft. I had a friend over to watch a few episodes of The Loretta Young Show and while he was here I showed him the magic mushrooms I made from the kit I ordered from Fancy Tiger in Denver, where I’ll be doing a public appearance in June. He looked at the fuzzy little toadstools and described his reaction to them as “perplexed”. I demonstrated the technique to him on one of the mushrooms and felt a little absurd, poking this sharp little needle into the diminutive red and white faux fungi. I see what he means… The craft is actually lots of fun to do and yields delightfully fuzzy (albeit strange) little objéts that can grace a mantle or diorama or in some cases be used for jewelry or trimmings on clothing. The kit I bought had everything I needed to make several mushrooms – red and white wool roving (cleaned and carded wool) a felting needle (an extremely sharp, barbed needle that catches and interlocks the fibers) a small piece of foam rubber to use as a work surface and the instructions.
This is what the needle looks like up close:
I began by dividing the red roving into three parts and forming one of the parts into a loose dome. I then placed the dome on the foam rubber and started piercing it with the needle.
It’s really quite remarkable how quickly the dome begins to hold its shape. It becomes more compact and a bit smaller as you work.
Once the dome was pretty well formed I moved on to the stem. I wrapped a small length of white roving around a skewer and slipped it off, then placed it on the foam rubber and started felting it.
The stem was a bit more challenging than the cap because it was a smaller shape. I found myself poking my finger a bit more while working on it. As directed, I turned the stem frequently to make sure it was forming an even cylinder. One end of the stem was left fluffy so it could be easily felted onto the cap. Upon completion of the stem I did just that. It really is clever how the two pieces fuse together with just a few pokes of the needle!
Cleaning up the surface of the work was done by the “drag and drop” method – dragging the needle across the surface of the work and then poking it in. This smoothes over the holes that are created by poking the needle repeatedly into the felt. The last step was to apply the white spots to the surface of the mushroom cap. This was done by taking a small piece of roving and rolling it between my fingers into a ball.
Then apply it to the surface by poking it with the needle to fuse it down. Initially I used too large a piece and had a hard time making it look even, but I soon figured out that you didn’t need much to make a nice sized spot.
I decided to style the mushrooms I made into a little mini forest scene. I picked up a log in the floral district (I know, you country folk are going to tell me that it’s absurd to buy a log, but in New York, one does what one must), some moss and some tiny butterflies. To mount the mushrooms I pounded finishing nails into the log and pulled the stems down over them. Then I trimmed them with the moss and a butterfly and Poof! I have a darling spring centerpiece for my table!
If you’re in Denver, I hope you’ll join me on June 17th at Fancy Tiger for a cocktail party, and then at the Denver Public Library on June 18th for a class on tassels and pompons that I’ll be giving and a signing of my book. More information about it all soon!

I was quite pleased with the results of my first foray into needle felting. The kit from Fancy Tiger was the perfect way to start. You can buy it and their other felting kits here. The craft is very easy to learn and the perfect thing to do while spending a quiet evening at home. I have lots of ideas about how to adapt the craft to my own creative ends so you’ll be sure to see some project ideas pop up here for the technique from time to time. I have only one question: how do I dust them?