Fabulous Felted Fungi - Needle Felting Mushrooms
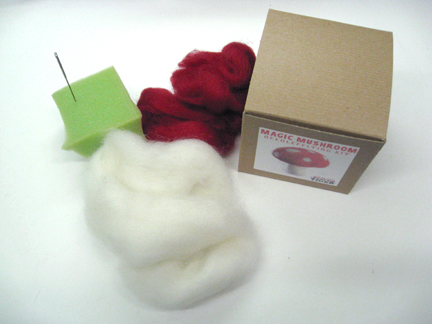
Needle felting is a very strange craft. I had a friend over to watch a few episodes of The Loretta Young Show and while he was here I showed him the magic mushrooms I made from the kit I ordered from Fancy Tiger in Denver, where I’ll be doing a public appearance in June. He looked at the fuzzy little toadstools and described his reaction to them as “perplexed”. I demonstrated the technique to him on one of the mushrooms and felt a little absurd, poking this sharp little needle into the diminutive red and white faux fungi. I see what he means… The craft is actually lots of fun to do and yields delightfully fuzzy (albeit strange) little objéts that can grace a mantle or diorama or in some cases be used for jewelry or trimmings on clothing. The kit I bought had everything I needed to make several mushrooms – red and white wool roving (cleaned and carded wool) a felting needle (an extremely sharp, barbed needle that catches and interlocks the fibers) a small piece of foam rubber to use as a work surface and the instructions.
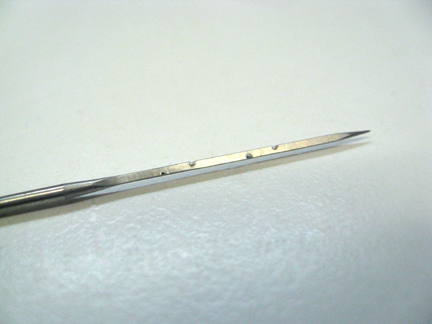
This is what the needle looks like up close:
I began by dividing the red roving into three parts and forming one of the parts into a loose dome. I then placed the dome on the foam rubber and started piercing it with the needle.
It’s really quite remarkable how quickly the dome begins to hold its shape. It becomes more compact and a bit smaller as you work.
Once the dome was pretty well formed I moved on to the stem. I wrapped a small length of white roving around a skewer and slipped it off, then placed it on the foam rubber and started felting it.
The stem was a bit more challenging than the cap because it was a smaller shape. I found myself poking my finger a bit more while working on it. As directed, I turned the stem frequently to make sure it was forming an even cylinder. One end of the stem was left fluffy so it could be easily felted onto the cap. Upon completion of the stem I did just that. It really is clever how the two pieces fuse together with just a few pokes of the needle!
Cleaning up the surface of the work was done by the “drag and drop” method – dragging the needle across the surface of the work and then poking it in. This smoothes over the holes that are created by poking the needle repeatedly into the felt. The last step was to apply the white spots to the surface of the mushroom cap. This was done by taking a small piece of roving and rolling it between my fingers into a ball.
Then apply it to the surface by poking it with the needle to fuse it down. Initially I used too large a piece and had a hard time making it look even, but I soon figured out that you didn’t need much to make a nice sized spot.
I decided to style the mushrooms I made into a little mini forest scene. I picked up a log in the floral district (I know, you country folk are going to tell me that it’s absurd to buy a log, but in New York, one does what one must), some moss and some tiny butterflies. To mount the mushrooms I pounded finishing nails into the log and pulled the stems down over them. Then I trimmed them with the moss and a butterfly and Poof! I have a darling spring centerpiece for my table!
If you’re in Denver, I hope you’ll join me on June 17th at Fancy Tiger for a cocktail party, and then at the Denver Public Library on June 18th for a class on tassels and pompons that I’ll be giving and a signing of my book. More information about it all soon!
I was quite pleased with the results of my first foray into needle felting. The kit from Fancy Tiger was the perfect way to start. You can buy it and their other felting kits here. The craft is very easy to learn and the perfect thing to do while spending a quiet evening at home. I have lots of ideas about how to adapt the craft to my own creative ends so you’ll be sure to see some project ideas pop up here for the technique from time to time. I have only one question: how do I dust them?


I would love to try growing mushrooms on my kitchen window! Thanks for the chance to win! cubensis spores
ReplyDelete